Wednesday, November 6, 2019

Mikrotik Install additional Package

Mikrotik is a popular brand among many router brands for traffic routing. Usually when we install mikrotik all the necessary packages are installed. So we don't have to install a package separately. But when mikrotik gives new package updates differently, they have to be manually installed. And these packages are provided by mikrotik on their own website, from which to download.
Today we will see in this article how to install a package in mikrotik separately.

After downloading the first package, we will upload it to the Mikrotik router. Clicking on the file button within the router opens the file menu. Then place the package file by drag & drop it in the menu and it will be uploaded.

After the upload is complete, just restart your router and it will automatically install the package. And it will show in the router's package list.

We will now look at the whole process graphically.

We used winbox here to gain access to the router. After accessing via winbox, we will open the file menu by clicking on the file button. 


After opening, just drag you file into the file menu. The upload process should be started.


After complete the process just restart your router. During the router startup, package will be installed. We can see this package in the Mikrotik Package list. If it is not available then open the "Log" and find the issue.


To go to the package list click on the "System" and then click "Package".


You can also upgrade, downgrade or uninstall any package from this list. Hopefully you can now successfully install your package.

Thanks.

The program can't start because api-ms-win-crt-runtime-|1-1-0.dll is missing from your computer.

Today we are going to discuss about one common error message during start the software. After installing when we are going to run the software, we got the following error message.


That means, the software we are trying to run is based on api-ms-win-crt-runtime.dll. And we get this DLL file from Microsoft Visual C ++ 2015 Redistributable Package. So when this software is not installed in our computer, and depending on which software we run, we get the error message. 

So to solve this problem we just need to install the Microsoft Visual c ++  Redistributable package. Only then will our software run.

We may download the software from Microsoft's website if we wish. The download link is given below:


After installing it I hope the problem will be solved.

Thanks.

Thursday, September 5, 2019

Microsoft Office Installation Error 1935


The most popular of the office management applications is Microsoft's Office Management application software. Some new laptop already have installed trial version of this software. If we want, we can just buy the license for this trial version application or uninstall it and install another version in a new way. But when uninstalling this built in version and installing another version in a new way, we are facing into a problem. Today we will discuss about that problem.

During installing the new version after uninstalling the built in one, we get an error message whose code number is 1935. Below is a screenshot of which.


This problem is not difficult to solve. After uninstalling the trial version, a value from the registry of windows have to be renamed, which is the value called "AppModel". After renaming this value, we will install another version of the office application. Then no more error message will show.

The full path of registry is given below:-

Hkey_Local_Machine - Software - Microsoft – AppModel

This is the solution for the error code 1935.

Wednesday, August 21, 2019

A Connection to the Remote Computer Could not be Established.

We are using VPN service connect to our corporate office from remote location. Because of this service, we can access our corporate office resources. It's no matter where we are at, it's only  needed internet access.

But occasionally some unexpected issues occur while establishing this VPN connection. Today we will discuss a similar issue in this article. 


A connection to the remote computer could not be established. You might need to change the network settings for this connection. 


We get this error message when establishing the VPN connection. Typically, with a virtual adapter, the windows operating system established this VPN connection. Due to problems with those virtual adapters, we get error message. So resetting the virtual adapter will solve our problem. From "Device Manger" we can reset these adapters. The following adapter needs to be reset for resolution. These adapter are hidden by default. We need to enable "Show hidden device" option for viewing these adapter. 

Wan miniport IP
Wan miniport ipv6
Wan miniport pptp


To reset these adapter, just right click on that and select uninstall. After the uninstall complete, just restart your computer. 

Here whole process is shown via graphical mode.

To open device manager, open "run" from start menu. And then type "devmgmt.msc". After opening the "Device Manager" console go to "View" tab from "Menu bar", and click on "Show hidden device" option.


Now expand "Network adapters". Right click on those adapter and select "uninstall". Here, you should remember one thing. If you use "PPTP" vpn then you should uninstall "WAN Miniport (PPTP)". If you use "L2TP" VPN then you should uninstall "WAN Miniport (L2TP)".


That's all. After the uninstall complete, just restart your computer. The VPN connection should be established now. 

Friday, August 2, 2019

We Couldn't Install Windows in This Location You Choose. Please Check Your Media Drive.

At present, Microsoft's most modern and popular operating system is "Windows 10". So many of us upgrade our old systems to windows 10. We have several problems during this upgrade or when installing windows 10 on an older system. We will discuss a one of those problem here today. 

When installing windows 10 on an old system, we often got the following message. 


We couldn't install windows in the location you choose. Please check your media drive.


There are two types of communication mode in the storage, that we use in our computer. One of them is "AHCI" and the other one is "IDE" or "ATA". These are also called hard disk controller mode. 

Of these controllers, windows 10 only supports "AHCI" mode. So without this mode we cannot run or install windows 10 using any other mode. And that's why we get that error message. If the hard disk controller mode "ATA" or "IDE" is selected during windows 10 install, we will face this problem. And to solve this problem, we need to make the controller mode "AHCI". 

And this hard disk configuration mode can only be selected form the "BIOS"."BIOS" can have this option under different names. Such as, SATA Configuration, SATA Mode, Storage Controller etc.  

Whatever the name it is, our purpose will be hard disk configuration mode "AHCI" is selected. So, that error message won't come. Also we need to keep in mind that, boot mode must be selected as "UEFI" mode. In this case, there should be no "Legacy" or any other mode. Otherwise the system will not boot. 

Hope you will be  succeed. 

Tuesday, July 16, 2019

How to Run Network Application via Command Line

At present, we are using many kind of application software. May be this application software is installed in our computer or this software may be installed in the server. If the software is installed in the computer, it will run directly from the computer. And if the software is installed in the server, it will run the software from the server through the network. That means, we will run the software with access to the server.

In two ways, we can get access to the server. One is graphically and another one is through the command prompt. Generally we all use graphical access because we do not need to know any command in this method. We can do all the work in graphical view. But in command prompt, we have to know the command to execute any kind of work.

Today, we will learn about how to run network application through the command prompt. Because many of the time, it requires to run the application via command prompt.

We can run a software from the network using the below command.

"start"

The complete command (sample) is:-


start \\192.168.3.239\SYSTEM\SALES\syslogon.exe


Here "start" is the main command and rest of the line is network path.

In network path, write down your network application path. Now press the enter. Now your software will run.

Monday, July 15, 2019

How to Create MAP Drive in Windows

In a shared folder within the network, we can access the various ways. For example, we can get access using the "Double Back Slash (\\)" sign within the "Run" option. Another way we have, map the shared folder with our computer. This method is called "Map Drive" or "Drive Mapping".

The biggest advantage of this drive mapping is that, the share folder does not have to be connected repeatedly. Once connected, it will be automatic connecting since then.  But in other cases, whenever it needs access to the share folder, it must be connected.

Today we will see in this article, how to mapping the drive in windows.

First we need to create a shared folder or share the existing folder that we want to map.

Map drive can be created in two ways. First of all, we can create a map drive from "This PC" or "My Computer" option within desktop. Just right click on "My Computer" icon or "This PC" icon and select "Map Network Drive". However if you want to map by using this method, then you have to enter the entire network path.


 And the second method is, just right click on the shared drive and select "Map Network Drive" option. Here, network path will be added automatically. Just as below:-


Now we will discuss the step by step process. First of all Method one.

Just right click on "Computer" icon or "This PC" icon from desktop and select "Map network drive".


Then following interface will appear. Now you have to type the network path. And finally, click "Finish" button.


Now map drive will appear inside the drive list on "This PC" or "Computer" option.


Now we will discuss about the second way, how to create a map drive.

At first go to the shared folder and right click on it. Then select "Map network drive".


Now click on "Finish". Automatically network path will be added.

Done. Now open "Windows Explorer" to access your map drive.


Wednesday, June 19, 2019

How to Disable Kids Mode in Samsung Galaxy Tab

Tablet devices are the most popular for kids due to gaming experience. For example we can say, APPLE'S iPhone and SAMSUNG Galaxy Tab. Today we will discuss a feature of the Samsung Galaxy Tab, which is named Kids Mode.

Generally Kids Mode is a gaming application, that has been developed for kids. Through this, the kids can enjoy various types of games. Once the kids mode is activated, the PIN can be set to return from there. Unless the PIN is provided, the normal mode can not be returned. 

So it can be said that, if this PIN number is lost for any reason or the PIN does not work, then the device cannot be operated in the normal mode. To get rid of this problem, many of us perform factory reset on the device. That's why sometime many valuable data have to be lost. 

Today we will discuss here, how to return to normal mode from kids mode without losing any data. 

Just like how we can access the safe mode in the windows operating system, we can access the safe mode even through the Samsung galaxy tab. If access to this mode, no application will start automatically. For the convenience of which, we can uninstall the kids mode application from the application manager. As a result, the kids mode will no be active again during the normal startup. We can use our device in normal mode. 

Now we will know, how we can get access to safe mode.

At first we will turn off the device. Then we will hold down the "volume down" button  and press the "power button" simultaneously to power on the device. We will keep the "volume down" button pressed, until the device is  fully started. After the full start, we will see the "Safe Mode" logo on the bottom left on the screen. That means we have accessed the device via safe mode. Now we can go to the application manager and uninstall the kids mode application. 

Well, all our work is finished. Now restart the device again. Hope the device will no longer access the kids mode.

Tuesday, June 18, 2019

How to View Saved Password in Windows

We know that the user ID and password are required to access any of the network resources. And this credential have to be permanently saved. Otherwise, you will have to re-enter your credentials once you restart your computer. That's why we save it permanently. Microsoft Windows saves this data in "Windows Credential Manger". 

But sometimes, due to various reasons we have to see the user id and password from this credential manager. But "Microsoft Windows" do not let us see any data from here. Microsoft windows keeps it encrypted. Just like the below:-


So we have to get help from third party software. Today we will discuss this with a software like this.

CredentailsFileView is a complete free software, that allows us to see the user id and password from the credential manager. If you provide only the administrator password or logon password after running the software, it will show all the data of the credential manager.

The full step is shown through the screenshot.

First of all download the software from the below link and run the CredentialsFileView.exe file. This is a portable version that's why there is no need to be installed anything.


After running the software you will get the following interface.


Now select the root folder from drop down menu and type your windows logon password or administrator password. And then press "ok".


Now you will get all the information what is stored into the credential manager. And the data is plain text mode.


Thursday, June 13, 2019

Automatic Driver Download Software

There is a software with any type of computer hardware. This software is called "Driver" software. Unless this drive software is installed in the computer, the hardware will not work. Any computer has some common hardware. Such as, Lan Card, Graphics Card, Sound Card, USB Card. Each of these hardware has its own software, which we call the driver. Only those devices will be activated, if these divers are installed. Otherwise it will not work. 

Usually, every manufacturer gives their device or hardware with drive software. Or we can download them from their website. 

But in some cases, we do not get the driver with the device. Again we can not download it from the manufacturer's website. In that case, we have to search and download it from third party website which is often a lot of trouble. 

Today we will discuss about a software, that will remove this problem from us. This software has a much larger database. Where almost all the device's drivers are available. When this software is installed, it scans whole computer and provide a list of hardware that is connected to this computer. In this list, it also provide the download option for that device driver. So we can download any device driver very easily. 

The software that we talked about is called "3DP Chip". Step by step discussion on how to use this software is discussed below.

After starting the software we will get the following interface with hardware list.


If the multiple device is available then (+) sign will be shown in right side.


Just click on that (+) sign. It will open the new list.


For driver download just click on that device. Now it will open default browser with driver download option. If we want we can easily backup our installed driver with this software via the "Driver" Menu.


That's it. By using this, we can easily download any device's driver for any computer. Just we need to install this software.

We can download the software from the below link.


How to Remove File or Folder Permanently

Usually if a file or folder is deleted, it will be stored in the recycle bin. One advantage in this case is that, if we delete something in the wrong way, we can bring it back. If we want, we can delete that file completely from this recycle bin. 

Generally, we want to delete our personal or confidential documents very often. We know that when removing anything from the recycle bin, it is completely deleted. But, in this situation it is possible to recover the files again. There are many data recovery software, that can be used to recover deleted data. Because of which, if we want to delete a file or folder as unrecoverable, then we need to delete the data using a third party software. This software is named "Eraser". 

It can delete any document in such a way, that it can not be restored. This software adds itself to the context menu of "Windows Operating System". So that, we can easily delete any file or folder in the right button click. Below is a screenshot.


Just click the "Erase" option. Software will do the rest of the things.

You can download the file from the below link or you can search on google.


Monday, May 20, 2019

How to Remove Software Completely From Windows

Usually a computer user needs to install and also uninstall some kind of software frequently. To uninstall a software, we usually use the default application windows. When a software is installed, files in that software are kept in different locations. So, to uninstall any software, files must be deleted from each of these locations. Otherwise, the software will not be uninstalled completely.

When using default application of windows during uninstall any software, it does not delete files from every locations. Later we have to manually find and delete that files. This is not a major issue for small software. But, there are many kinds of software, such as "AutoCAD", "Photoshop", "Illustrator", in that case the files are very hard to find.The files are scattered throughout the various locations.

So to do this difficult task, we rely on different third party software. Because this process cannot be done with the default application of windows.

The software that we will discuss today is named "Revo Uninstaller Pro". By default, any kind of software is installed on the "C" drive into "Microsoft Windows". So at first this program uninstall a software and then scan the entire "C" drive for any remaining files. Even this program check the windows registry for any settings if there is available. This program has three options for scanning. Which are safe, moderate and advanced. After scanning, if the program has found any remaining files, it will be shown in the list. We can easily delete the files from there. Also we can check the registry value for software by using this software. Moreover, if we want to permanently delete any file or folder, we can use this program. We can also find out, which software is run automatically as soon as computer start.

How do we uninstall a software using this program, it is shown below through the screenshot.

After starting the software we will get the following interface.


Now right click the software and "Uninstall", which we are going to uninstall.


The uninstall process will be started and scan selection mode will be appeared.


Now select your preferred scan mode and click on "Scan" button. Now this program will scan entire "C" drive for searching any remaining file by that uninstalled software.


For delete the files simply click on "Select All" button and then "Delete". Finally click on "Finish".

From "Tools" menu, you will get more option to work with this software.

But one problem is that, this program cannot be used for free. That means, it is a paid version program.

Sunday, May 12, 2019

Windows Cannot Be installed to This Disk. The Selected Disk Has an MBR Partition Table.

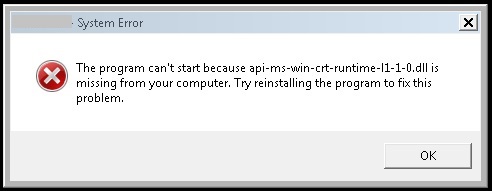
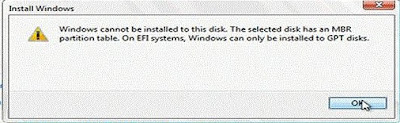
In most cases, user end computer device storage is usually used in two types of partition table. One is the MBR partition table and another is the GPT partition table. Starting with "Windows 8", there are several operating systems of "Microsoft", all of which require the use of GPT partition table. Otherwise, operating systems will not be installed on that storage device. Because of that, when we are trying to install a version of "Windows 8" or later in the MBR partition table, we get the following error message:-


Unless we take this partition from MBR to GPT, we cannot install operating system on this hard disk. There are so many third party software to convert partition from MBR to GPT. Here we will use a windows tool named "Diskpart". This is a command based tool. In the command prompt, we can run this conversion process using the "Diskpart" command. However, the entire hard disk will be formatted in this manner. So if there is any data in the hard disk, then we can not find them after convert. So before converting using this method, we need to take backup of the data. 

In another way, we can run this conversion process. But in this way, we don't need to take the data backup. We will do this with the help of a third party software name "Easeus Partition Master". This software has free version and also paid version. However, we need paid version to do our job. The following link software can be downloaded. 


Using this two methods, how to convert a hard disk from MBR partition to GPT partition style, we can see the whole process through the screenshot.

First we will discuss about the "Diskpart" command line tool. It is a built in tool of windows. That is to say, you don't need to download or install anything to work with this software. It is already installed in windows.

To run this tool, we will type "diskpart" in the command prompt and press "enter". Now we have to select hard disk. All the hard disk in a computer are connected, each one is given a unique ID. If we have more than one hard disk connected to our computer, then we will know about the disk ID by checking the disk list. If one hard disk is connected, then the hard disk ID will be 0 (Zero). The command to check the disk list is:- 

list disk

To select disk, our command will be:-

Select disk 0


We assume that, we have one hard disk hooked here. Now to run the convert process, we will use the following command.

convert GPT

We must remember, before converting using this method, we have to take backup of our data otherwise we will lost it. Because the entire hard disk will be formatted during the conversion process. Now, let's show the process through the screenshot. 

Now run the "diskpart" tool from the command prompt. However, command prompt must be run with administrative privileges. 


After pressing the "enter" button, console will started.


Now check the disk list and find out the hard disk ID. After getting the ID, select the hard disk and run the convert command.


Now we will see, how we can convert using the "Easeus Partition Master" software. After running the software we will get the following interface. From this interface we can see, our hard disk has been detected. 


Now, right click on "Disk 0" and select "Convert MBR to GPT".


Now, finally click on "Apply" and restart your computer.


We can use this software to boot the computer. That means, we don't need to load operating system to run this software. We can run the computer directly with this software using a pen drive and run the entire conversion process exactly the same way. 

The way you can create a bootable pendrive using this software is shown below.

First of all connect your USB into the computer and click on "WinPE bootable Disk".


Now you will get the following interface. From here, select your USB and finally click on "Proceed".


If we want, we can simply create an ISO file using the "Export ISO" option. Which we can use later on other computers.


Well, all the work is done. Now we can install our operating system without any error.

Sunday, May 5, 2019

Samsung Galaxy J2 6 Touch Not Working After Update


Currently Samsung has occupied a huge space in the world's mobile market. After a specific time, they are bringing new models to the phone market. And now a days, Samsung's most popular mobile phone is the "Galaxy" Series phone. Besides, the software is updating after a periodic time to improve the user experience. With this updates, the new features being added to the mobile phone. But sometimes these updates have to be a lot of  trouble for users. Occasionally, there are some updates that conflict with our device. Today we will discuss a problem like this. Which is usually found in Samsung Galaxy J2 6 mobile phones.

A recent problem has been found that, the touch screen is not working after updating the Galaxy J2 6 devices. The touch screen does not work even after the device is reset to the default. Here, we will see the solution of this problem.

The problem is basically due to the device's touch file being corrupted. Anytime during the update install, the file gets corrupted in any way, due to which the device's touch system becomes ineffective. If we repair the file, then our problem will be solved.

To perform this repair work, we will get the help of a software called "Odin", which will connect to our mobile phone to the computer. So now, we can download the "touch" file and "Odin" software from the given path.

https://drive.google.com/file/d/1iqV3IL059GgNEQfnF5aVPMAKiUutK7o9/view?usp=sharing


Now, we will connect our mobile phone to the PC using USB cable. Then execute the downloaded "Odin" software. At this stage, the software will detect our phone. Then from the "AP" option, we will select the downloaded touch file. Then we will finally click  on the "Start" button.

Well, all our work is finished. The software will repair the corrupted touch file. I will show the whole process through the screenshot.

We will get the following interface after running the "Odin" software.


Now the software will try to detect the mobile phone. If it gets, it will show the "Added" status.


Now we will select the "Touch" file from the "AP" option.


After locate the "Touch" file, click on "Start". Job steps will be showed into "Log" area.


When all the work is done, the mobile phone will automatically restart. Hope problem will be solved now.

Wednesday, April 24, 2019

How to Convert FAT32 to NTFS File System Without Format.

When the data is stored in a storage device, it is followed by a specific file system. The storage device means, it can be a hard disk or it can be a flash drive. The method of keeping data of these storage devices, changes based on the file system. As such, using the FAT32 file system data will store in different manner, again using the NTFS file system data will be stored in different way. Each file system's data saving process are differs. It means that, there is no match with any file system. 
A storage device that supports file systems can only read data from that file systems, others can not. For example, the device that supports the NTFS file system, can only access files using NTFS and cannot read any file using the FAT32 file system. 

Because of that, sometimes we need to change our file system. Normally we can change the file system while we format the storage device. Some of the most commonly used file systems are FAT32, NTFS, exFAT, and EXT4. 

But now, to change the file system, if we need to format the storage device, then we will lose the data on our storage device. Because all data will be deleted as soon as you format.  

In this article we will discuss, how we can change the file system of a storage device without formatting. There are many third party software to do this. But here, we will use DOS command of windows to change the file system of a storage device.  

We can convert the file system without losing any data using the following command:-

convert   c:  /fs:ntfs

Here "C" is represented as drive letter. If our drive letter is "E", then our command will be:-

convert   e:  /fs:ntfs

We will execute this command from the command prompt. Below is a screenshot given:-


To avoid undesirable error, it is better to open the command prompt with administrative privileges. For this, just right click on command prompt and click on "Run as Administrator."

Using this method, can only be converted from the FAT32 file system to the NTFS file system.  


Good Luck.

Thursday, April 11, 2019

How to Reset Administrator Password in Windows

All of us who use MICROSOFT'S operating system, must be know about windows's administrator account. Using this account, a computer can be completely controlled. So for security reasons, we strengthen this accounts's password. And also change the password in a specific time.

This way the password is strong and after a few consecutive changes we forget the password many times. As a results, we can no get access to our computer. For which, we need to reset the password. If we have already created a password reset disk for this account, then we can easily reset our password. And if this disk is not already created, then we need to take the help of any other third party software. There is no other option left to reset the password.

Now, we will discuss about a software called "Offline Windows Password & Registry Editor". We can download this software as an ISO and it is bootable, that means you can run the computer using this software. This is a complete command based platform. How can we reset the administrator password using this software, as shown below through the screenshot.

First we will download the ISO file from the following link.


At the bottom of the page we will find the download section. From there, download the CD Image. Just like below:-


Then make a pendrive bootable with that ISO file. The following link are discussed about how to make a pendrive  bootable with ISO file.


We can also write the ISO file to CD and boot from it. After booting, we will get the following interface.


In the hardisk, whether windows is installed, the software will check it at this stage. If it get any windows after checking, then it will show it in the list. If we have more than one windows installed, then this list will show that too.


We will notice that, there is an unique number on the left side of every entry in the list.


We will select our windows by using this unique number for password reset. Just based on this example, type 1 (one) and then press "Enter".

Now the option to load the registry will come.


Since we will reset the password, we will now type 1 (one) and press "Enter".  Because the unique number for password reset is 1(one).

Now "Main Interactive Menu" will be appeared. From here, we will also type 1, because we will change the user password.


Now the user selection option will come, that means for which user we will reset the password.


Now we will type the "RID" number for that user, in our case "Administrator". After typing the RID number than press "Enter".

Now "User Edit Menu" will come. From here, type 1 for clear password and then press "Enter".


If there is no other problem, now we will get confirmation of password clear.

Everything is done. Now press (ctrl+alt+delete) from keyboard for restart you system.