Many professionals use "Putty" software for SSH or telnet client or for serial access. There is an opportunity to change various settings in "Putty" just before connecting to remote server. Such as font color, font size, background color etc. After changing all these settings, if we do not save it, then we have to change it again before connecting to any remote server. For example, once we change the font size, if we don't save it, we have to change it every time. In this tutorial we will learn, how to permanently save changes in font size, font color and other settings in "putty". Then let's start:-
The first thing to know is that, when "Putty" connects to a remote server, he creates a session with that server. We can save these sessions, if we want. When saving these sessions, it also saves all the related settings. For example, what was the font size in that session, which font color was used and many more. This will use the same settings later, when reconnecting to that server. If no session has already been saved for that server, then default settings will be used for that connection. Today, we will do this using default settings in this tutorial. We will get a list of all our saved sessions in this location:-

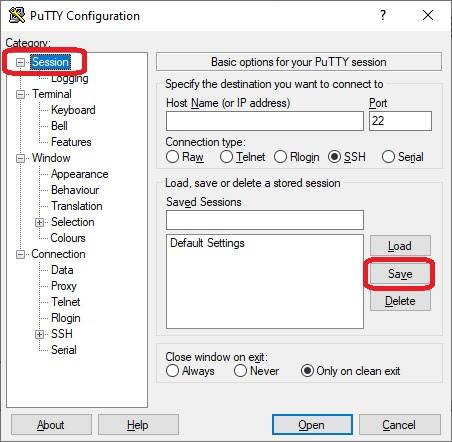
Since I have not saved any session here, only default settings are shown. Now if we create a telnet or SSH connection with any server, then all the configurations in this "Default Settings" will be applicable for that connection. This "Default Settings" works like a profile. This is a complete set of many configurations. So now if we need to change any configuration permanently, we have to do it from this "Default Settings" session. To edit this "Default Settings" session, we need to load it first. We will use the following method to load it:-

Just select the "Default Settings" and then click on "Load". After clicking on the "Load" button, it will load. Now we will make all the necessary changes. After making change, we will save all the changes permanently by clicking on the "Save" button. If you do not save it, then it will be temporary. As soon as the "Putty" is closed, everything will go back to "Default Settings" state. The process of saving is simple. Simply click on the "Save" button.
In this tutorial, we will try to change the font size as an example. After loading the "Default Settings ", expand "window" from category menu. Just click on (+) sign.
Now click on "Appearance". Then click on "Change" from the right panel under the "Font Settings" section.
After click on the "Change" button, you should be appeared by the following interface. From here, you can change not only the font size, font name and font style also.
After making your change click on "OK", and go to the "Session" category. From here, click on "Save" button to permanently save it.
Everything is done. From now on, these font settings will be applied when connecting to any server.


No comments:
Post a Comment