Saturday, June 27, 2020

Putty Font Size/Font Color Permanently Change

Many professionals use "Putty" software for SSH or telnet client or for serial access. There is an opportunity to change various settings in "Putty" just before connecting to remote server. Such as font color, font size, background color etc. After changing all these settings, if we do not save it, then we have to change it again before connecting to any remote server. For example, once we change the font size, if we don't save it, we have to change it every time. In this tutorial we will learn, how to permanently save changes in font size, font color and other settings in "putty". Then let's start:-

The first thing to know is that, when "Putty" connects to a remote server, he creates a session with that server. We can save these sessions, if we want. When saving these sessions, it also saves all the related settings. For example, what was the font size in that session, which font color was used and many more. This will use the same settings later, when reconnecting to that server. If no session has already been saved for that server, then default settings will be used for that connection. Today, we will do this using default settings in this tutorial. We will get a list of all our saved sessions in this location:-


Since I have not saved any session here, only default settings are shown. Now if we create a telnet or SSH connection with any server, then all the configurations in this "Default Settings" will be applicable for that connection. This "Default Settings" works like a profile. This is a complete set of many configurations. So now if we need to change any configuration permanently, we have to do it from this "Default Settings" session. To edit this "Default Settings" session, we need to load it first. We will use the following method to load it:-


Just select the "Default Settings" and then click on "Load". After clicking on the "Load" button, it will load. Now we will make all the necessary changes. After making change, we will save all the changes permanently by clicking on the "Save" button. If you do not save it, then it will be temporary. As soon as the "Putty" is closed, everything will go back to "Default Settings" state. The process of saving is simple. Simply click on the "Save" button.


In this tutorial, we will try to change the font size and the font color as an example. After loading the "Default Settings ", expand "window" from category menu. Just click on (+) sign.


Now click on "Appearance". Then click on "Change" from the right panel under the "Font Settings" section.


After click on the "Change" button, you should be appeared by the following interface. From here, you can change not only the font size, font name and font style also. 


After making your change click on "OK", and go to the "Session" category. From here, click on "Save" button to permanently save it.


Everything is done. From now on, these font settings will be applied when connecting to any server. In similar way, now we will go for changing the font color. For that go to "windows" category and select "Colors".


You should be appeared by the following interface. Click on "Default Foreground" from "Select a color from adjust field" and then click "Modify".


Now you should appeared by the "Color" interface. Select your favorite color and then click on "OK". In this example, I am going to select yellow color.


Now click on "OK". Now, the "Putty" text color should be like this.


Again, if you want to save this settings permanently, please go to "Session" and then click "Save". From now on, if you turn off "Putty" our settings will be saved. There is no need to configure anything before making any connection.

Thursday, June 25, 2020

Putty Permanently save Changes

Many professionals use "Putty" software for SSH or telnet client or for serial access. There is an opportunity to change various settings in "Putty" just before connecting to remote server. Such as font color, font size, background color etc. After changing all these settings, if we do not save it, then we have to change it again before connecting to any remote server. For example, once we change the font size, if we don't save it, we have to change it every time. In this tutorial we will learn, how to permanently save changes in "putty". Then let's start:-

The first thing to know is that, when "Putty" connects to a remote server, he creates a session with that server. We can save these sessions, if we want. When saving these sessions, it also saves all the related settings. For example, what was the font size in that session, which font color was used and many more. This will use the same settings later, when reconnecting to that server. If no session has already been saved for that server, then default settings will be used for that connection. Today, we will do this using default settings in this tutorial. We will get a list of all our saved sessions in this location:-


Since I have not saved any session here, only default settings are shown. Now if we create a telnet or SSH connection with any server, then all the configurations in this "Default Settings" will be applicable for that connection. This "Default Settings" works like a profile. This is a complete set of many configurations. So now if we need to change any configuration permanently, we have to do it from this "Default Settings" session. To edit this "Default Settings" session, we need to load it first. We will use the following method to load it:-


Just select the "Default Settings" and then click on "Load". After clicking on the "Load" button, it will load. Now we will make all the necessary changes. After making change, we will save all the changes permanently by clicking on the "Save" button. If you do not save it, then it will be temporary. As soon as the "Putty" is closed, everything will go back to "Default Settings" state. The process of saving is simple. Simply click on the "Save" button.


That is the process for making change permanently in "Putty" terminal software.

Thursday, June 18, 2020

Mikrotik PPTP Client Configuration

PPTP is stand for Point to Point tunneling protocol. This is the VPN Protocol, through which the VPN connection is established. In this connection process, the PPTP client creates a tunnel with its PPTP server. Later, data is transferred using this tunnel. This tunnel is usually built using TCP port 1723. In this lesson we will learn, how to configure Mikrotik router as a PPTP client. To know how to configure Mikrotik router as a PPTP server, please explore the following link.


Then we will learn, how to use this Mikrotik PPTP client to connect to another Mikrotik PPTP server. Finally we will see, how to route traffic from Mikrotik to Mikrotik router.

To configure Mikrotik as a PPTP client, we need to create a virtual interface named "PPTP Client". To create it, go on "PPP" from menu and then navigate to "Interface" tab. Now click on (+) sign and select "PPTP Client".


Now you will get the following interface. Navigate to the "General" tab and named your PPTP Client. In this example, I named it "Connect_to_PPTP-Server". 


Now, navigate to the "Dial Out" tab. Write your PPTP server IP address into "Connect To:" field. Also enter your PPTP server user name and password into the "User" and "Password" field. And select your profile. Here, I am using "default-encryption". Finally, select the authentication protocol. Here I have selected all the protocols.


After that, click on "Apply" and then click "OK". At this point, your PPTP tunnel should be connected. You can check the tunnel status from this interface.


Don't worry about my tunnel status. This is my lab environment. That's why it is showing "disconnected". But if you follow this tutorial step by step and your PPTP server has properly configured then you should be appeared "connected" status.

At this point, our tunnel is ready. But, still now we can't transfer traffic through this tunnel. Because, we don't configure any routing information yet. We have to add one static route entry for our destination network into our routing table. Let's say our destination network is "192.168.3.0/24". Without static route entry, if any user trying to get reach "192.168.3.0/24", all the packet should be dropped. Because, still now router don't know how to get reach that network, although our VPN connection is established. By adding the static entry we tell the router, if any user trying to get reach "192.168.3.0/24" network, then all traffic should be forwarded to PPTP tunnel.


If you want you can use tunnel interface directly as a gateway or you can use tunnel remote side address as gateway. Just like below:-


Again, don't worry about my "unreachable" status. From "Status" tab, you will get the tunnel remote side IP address.


At this stage, you data transfer should be begun.


Wednesday, June 17, 2020

Mikrotik PPTP Server Configuration

PPTP is stand for Point to Point tunneling protocol. This is the VPN Protocol, through which the VPN connection is established. In this connection process, the PPTP client creates a tunnel with its PPTP server. Later, data is transferred using this tunnel. This tunnel is usually built using TCP port 1723. In this lesson we will learn, how to configure Mikrotik router as a PPTP server. At the same time we will also learn, how to connect this PPTP server from windows machine using windows default VPN client. 
Okey, let's start with PPTP server. To enable PPTP server, go to "PPP" from menu and then click "Interface". Now click on "PPTP Server".


After click on "PPTP Sever" you will be appeared by the following interface. Just tick the "Enabled" option. Then click on "Apply" and then "OK".


At this time our PPTP server has enabled. Now we need to create a connection profile for VPN users who will be connected to this VPN server or PPTP server. To create profile, go to "Profile" tab and then click on "add" sign.


You will get the following interface for creating new PPP profile. Here, enter your profile name, local IP address and remote IP address. When a user will establish the VPN connection to this server using this profile, then the "Local Address" will be the server side IP address and "Remote Address" will be the client or user side IP address for that VPN connection. During making connection to the VPN server, one IP address will be assigned to the VPN user.  We will be able to configure which IP address will be provided to the user through this "Remote Address" option. The "Local Address" is for the server itself. Change "TCP MSS" to "yes" if not selected by default.

[Make sure your IP address is within range of your local network. Otherwise, all traffic of VPN users will be dropped.]


Here, we have two options to configure this "Local Address" and "Remote Address" field. We can use individual IP address for these field or we can configure a pool from our DHCP server. Next, users will be automatically given IP addresses from that configured pool. Just like as below:-


Now go to "Protocols" tab and change "Use Compression" value to "yes". As a result, all data will be compressed during transmission.


At this point, our user profile is ready. Now we are going to create the user credential for the VPN connection. This credential will be required for connecting to this PPTP server or VPN server. To create user go to "Secrets" tab and click on "add (+)" sign. 


Now enter your user name and password to the "Name" and "Password" field. And select your service type from the "Service" field, which service the user will provide. Here, we will select PPTP because we are going to provide that service. Finally, select the profile name from "Profile" field which we have create earlier. As a result, if anyone use this user name to make VPN connection, then they will be covered by this profile.


Everything is done. Our PPTP server is ready to provide VPN service. If a user makes a connection with our VPN server or if we want to know how many users are connected to our VPN server at the moment, we will get this information from the "Active Connection" tab.


Now we can use any VPN client software to make VPN connection to this server. In this tutorial, we will use windows default VPN client adapter. To know how to create VPN client adapter on windows, please explore the following link.


After the VPN connection is successful, we will go to the "Active Connection" tab and check whether there is any connection entry available. 


Yes, we got one entry for our VPN connection. Here, the "Name" field is describe VPN user name, "Service" filed is describe VPN type, "Caller ID" field is describe client public IP address, "Encoding" field is describe encryption method, "Address" field is describe remote IP address which we have assigned or profile during creation and finally "Uptime" is describe the time duration about how long this connection is created. 

Don't get confused with this username (VPN) and remote IP (192.168.3.230). This is my lab environment. Just ignore it.In this entry, you will get your VPN user name "pptp_user"(as our tutorial) and our remote address will be "192.168.3.200"(as our tutorial).

From now on, your remote user can connect to your corporate network over this PPTP VPN connection.


Wednesday, June 10, 2020

Disable Automatic Update on Windows 10

All of the operating systems currently in use, the most widely used is Microsoft's windows operating system. In a timely manner, each os's vendors provide updates for their products. In the same way, Microsoft's also provide updates for their windows operating system. Considering the convenience of the users, this update process has been made completely automatic. However, windows os users can control this update process if they want. A user can customize different types of settings as he likes. For example, whether the update process will start automatically, which update will be download and when they will be installed etc. Through this lesson we learn, how to disable the automatic update process for windows operating system. We can do this using two methods. First one is, using group policy editor tool and the other one is, using registry editor tool.

Let's start with group policy editor tool. Go to "Run" and type "gpedit.msc". Now press "ok" or "Enter" from your keyboard. “Local Group Policy Editor” should be appeared now. 


Now click on “Computer Configuration”


And then “Administrative Templates”. 


Now go on “Windows Component”.


Now select “Windows Update”.


Now find out “Configure Automatic Update” and double click on it.


At this time you should be appeared by following interface. Simply click on "Disable" button on it


And then click “Apply” and then click “OK”. Now restart your computer to take the effect. After restarting, automatic update should be disabled.

Okey. Now, we will perform the same job using "registry editor" tool. At this moment, we will use “regedit” tool to disable automatic update process.

Go to “Run” from “Start” menu and then type “regedit”. Now click on “OK” or press “Enter” from your keyboard. You should be appeared by “Registry Editor” interface. Now follow the following path:-

HKEY_LOCAL_MACHINE   ->  SOFTWARE  ->  Policies  ->  Microsoft  ->  Windows

Here is step by step for newbie. 

First of all, expand “HKEY_LOCAL_MACHINE” from "Registry Editor" interface.


Now expand “SOFTWARE


Now expand “Policies” and then “Microsoft


Now find out “Windows” and right click on it. Select “New” and then select “Key”.


The name will be for the new key is “WindowsUpdate”. Now right click on newly created key  “WindowsUpdate” and create another new key following same step under the "WindowsUpdate", which should be named by AU. Now press “Enter” from your keyboard. This looks like as follows:-


Now select “AU” and click the right button on the right panel on this interface. Select “New” and then select “DWORD (32-bit) Value”. Just like follows:-


The name will be “NoAutoUpdate”. Now double click on it and change “value data” to “1”.


Now click on “OK”. Everything is done. Restart your computer to take effect immediately.

Monday, June 8, 2020

Mikrotik Configure Vlan and Inter-Vlan Routing

In this tutorial, we are going to discuss about “Vlan Configuration” on Mikrotik router. And then we will discuss, how to route traffic between those vlans or inter-vlan routing. Here, we will create Vlan-100 and Vlan-200 to work with this lab. Let's start:-

First we will create a separate bridge interface for each vlan.  And then, we will associate one physical interface with those bridge interface as a bridge port so that, those physical interface can act as a default gateway for that vlan.

Go to “Bridge” menu and create two bridge interface. Here, we are creating two bridge interface because our vlan quantity is two. One bridge interface is for vlan-100 and another one is for vlan-200.

 
Here, we have named the bridge interface as like as our vlan number. This is completely optional. Anything you can be named.


After creating the interface, this will be look liked:-


Now we will associate one physical interface with each of those bridge interface. If you have required, you can associate one or more physical interface with one bridge interface. Then, these physical interface will be called “Bridge Port”.

To associate bridge port, go to “ports” tab and click add (+) sign.


In this lesson, we will going to associate "ether-8" with Bridge_Vlan-100 and "ether-9" with Bridge_Vlan-200. After creating the vlan-id 100 and vlan-id 200 and assigning them those bridge interface (Bridge_Vlan-100 and Bridge_Vlan-200) respectively, then all hosts connected to "ether-8" will be considered as vlan-100 member and all hosts connected to "ether-9" will be considered as vlan-200 members.


After completing the task, this will be look like:-
 

Now, we have to create the vlan interface or vlan-id. To create vlan, go to “Interface” menu and select “VLAN” tab. Click “add” or (+) sign.
 

Now, write your vlan name, ID and select your parent interface. This vlan ID will be assigned with that parent interface. Means, that interface will be treated under this vlan. In our case, the parent interface will be “Bridge_Vlan-100” for vlan-100 and and interface “Bridge_vlan-200” for vlan-200. Just like the below:-
 

Vlan name is optional. It can be anything. No need to match with vlan-id. For Vlan-200, this will be:-
 

 After completing the task, this will be as like:-


From now on, all hosts connected to “ether-8” under the vlan-100 and all hosts connected to “ether-9”, under the vlan-200.

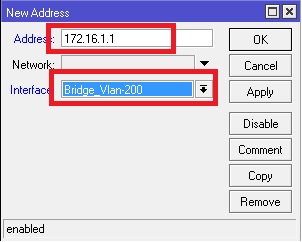
Now we have to configure the IP address for the default gateway for those vlan members. Otherwise, the member of the vlan-100 can’t communicate with the member of the vlan-200. We will have to assign IP addresses to our bridge interfaces. Our bridge interfaces will perform inter-vlan routing process. In this lesson, we are going to use “192.168.1.1/24” as our interface “Bridge_vlan-100” address and “172.16.1.1/24” as our interface “Bridge_Vlan-200” address. Here the IP address “192.168.1.1” perform as a default gateway for vlan-100 members and the IP address “172.16.1.1” perform as a default gateway for vlan-200 members. 

To assign IP addresses, we will go to “IP” section from menu and then we will select “address” section from sub-menu. The IP address for the interface Bridge_Vlan-100 is:-
 

And for the interface “Bridge_Vlan-200” is:-
 

Everything is done. Now assign the default gateway address to all vlan members.  Configure your all hosts computer for the default gateway as their gateway address. The both vlan can communicate with each others.